Wooden Scale Model Replica of the SR-71 Blackbird
Background and Inspiration
The idea for this project came up after my parents came to visit me after a little time apart. One of the first things my dad did was look around for the new things, a classic move by him. He stumbled across the wooden plane from a little while ago. You can check out the post I did about that plane, here.
My dad has always been a fan of vehicles and aircraft in particular. He has made a few model planes and 3D printed a bunch too. So I thought it was only fitting to make him one 100% made by me. One of his favourite planes is the Lockheed Martin SR-71 “Blackbird”. So this became my inspiration, to replica an SR-71 out of wood and gift it to him for Christmas.
Design
The overall design process was very similar to how I designed the first plane, yet it had to look like the actual SR-71. I decided to use Fusion360 again as I am more familiar with the software, manufacturing process, and its free for makers. The overall design was split up into a few steps, canvases, sketches, shaping and CAM (Computer-Aided Manufacturing). Combining all those, a little bit more and lots of back and forth, I was able to come up with a design, I thought looked like an SR-71.
Canvases
Canvases are what allows you to import images into Fusion360 and use them in your design. I spent a little bit of time scrolling through Google, trying to find a few nice pictures of the SR-71. Once I found a few images to use I found the process very straightforward. Import the image, set the scale and away you go! I used the dimensions of the previous plane I made as a guide to making the size, then tried my best to keep the rest of the plane to scale, which is pretty easy when following a canvas of the actual Blackbird.

Sketches and Shaping
Based on the canvases formed above, I started making some basic form sketches. I then used these sketches as a base to extrude in all axes to create a pretty boxy shape. Following the extrudes came the shaping. This consisted of using a variety of fusion tools and features including, rounds, drafts, and of course more sketches and extrudes. With a combination of it all, you get a basic SR-71 body!
CAM (Computer-Aided Manufacturing)
The longest part of this entire project, most likely because of my lack of experience and desire to have an accurate model. I spent a while going back and forth attempting to create new paths and optimise them, reducing the number of tool swaps and accuracy of the cut. I also utilised the flipping the piece to reduce the amount of individual parts to make and glue together.
For the main part, I used the prebuilt functions and selected a specific tool and parts each time. This allowed me to get an accurate result and reduce time by only doing sections at a time. The overall CNC time was still ages, clocking in at about 37 hours, excluding tool changes and new setups.

Final Design
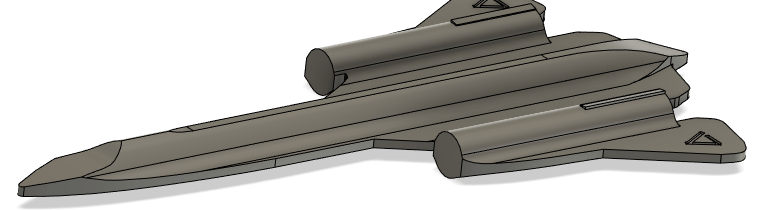
The final design needed 6 parts glued on. The exhaust, intake and rear wing, on both sides. This was similar amount to the original but was less than the first design which split up the parts further having the main wing, centre section and then the engines as well. The stand was the same design from the original jet plane, literally copy-pasted. The only difference was I engraved the base of it to have some text to add a little bit more to the overall piece. Below you can see one of the terrible renders of the model when I was trying to think of if I should paint it black to match the real plane.

Manufacture
All of the hard work was done inside Fusion360 and the CAM section. In saying that it was still a bit of effort setting up, and having only 1 final blank, meant I double and triple checked things a lot. That didn’t stop things from going wrong, but it’s all part of the process.
To make the set of SR-71s I utilised my Snapmaker 2.0. I bolted together the CNC router parts and set them up inside the enclosure for dust and noise control. I purchased various milling bits online and some different collet inserts as well. This allowed me to insert larger diameter cutters to help with bulk material removal.
I set up the block and ran a small script that put in 4 positioning holes that allowed me to mount and flip the piece pretty accurately. Once this was done it was just a matter of swapping the cutter, zeroing and running the next g-code setup. The g-code was already made using Fusion360, then all I needed to do was open in the Snapmaker Luban software and sent it over to the Machine. I did this extra step because I didn’t have any USBs around and why add in more walking when I could send all the Files over Wi-Fi at once.
There were a few hiccups along the way, mainly the constant snapping of bits… I did correct this by changing the paths a few times and the speed settings. Glad I had plenty of spare cutters to play with; Here are some little snippets from the manufacturing process.


Packaging
I don’t normally create packaging for projects, other than maybe a box that fits it all in. Even then it’s only when it’s being gifted or transported. In this case, the plane was doing both.
I used an online template generator to create a box template that I could print and cut out. This would enclose all of the pieces together. I cut this out by hand which didn’t turn out super accurate but worked nonetheless.
I used some spare EVA foam I had lying around to create some protective padding for the plane. These sections were simple enough to create using Fusion360 and the projection tool. I projected the outside closed loop of the part and created a bounding box around the projection, all matching the box dimensions. I then split the plane into layers corresponding to the thickness of the foam. This allowed me to create a sketch for each layer. I converted the sketch into a DXF and then sent the DXF to the laser cutter.
Gallery
Check out some pictures from the prototype and final products!


Hi Andrew, This is Tran, your CV brought me into your world of creativity. I’ve been wandering through projects (Hardware, Software, Everything). I am surprised to see you record your journey in here and this is really inspired me as well. Thanks for being my inspiration. I would love to see more from your content. These projects are really cool though.